
No products in the cart.
Hexeum Package Install Guide
Table of Contents
Table of Contents
To make the process as simple as possible, we have created this guide for installing and setting up your new stream overlays, graphics and widgets.
Streamlabs Widgets
Installation
- Locate the README file in the root of your package folder
- Double Click it, it should open in your browser
- To install all of the widgets, click the link below Install All Widgets
- To selectively install widgets then start with the first link and repeat this process for each one
- The link will direct you to Streamlabs, if you are signed in you will be shown the themed overlay, otherwise you will be prompted to login
- Select Create button beside Create a new Widget Theme. Name it press Create
- The theme overlay will now pop up, select Use next to the theme you just created
This step will have installed and activated the package widgets in your Streamlabs account
Setup In Streamlabs
- Select the gear icon in the lower left of Streamlabs desktop
- Navigate to Scene Collections
- Select Import Widget File In Current Scene
- The root of your package folder has a folder named Widgets, choose the widget you would like to import
Setup In OBS
- Press the + icon in the source section of OBS
- Select Browser -> Create New -> Ok
- See the resolution list for details on which width and height to use
- We now need to get the widget URL to paste into the URL field
- Go to https://streamlabs.com, select All Widgets from the vertical menu on the left of the screen.
- Select the widget you want to set up
- Click the Copy button next to the Widget URL section
- Back in OBS, paste (Ctrl + V) this link into the URL input for the browser source
- Press Ok
Repeat this process for every widget you want to add
Widget Resolutions
- Alert Box : 1000×1000
- Chatbox : 1280×1000
- Dono Goal : 1080 x 400
- Event List : 800 x 600
Customization
Alert Customisation
- See above video on how to navigate to your alert box widget. Alternatively follow this link to quickly get there https://streamlabs.com/dashboard#/alertbox
- Select the alert type you would like to customize, in the video example we selected the follow alert
- Scroll down until you see a Custom Fields tab
- Select this tab and you will see all of the customization options as shown in the image below
- After you make any changes make sure to press Save Settings to apply those changes

NOTE : Your customisation settings may vary from those shown in example.
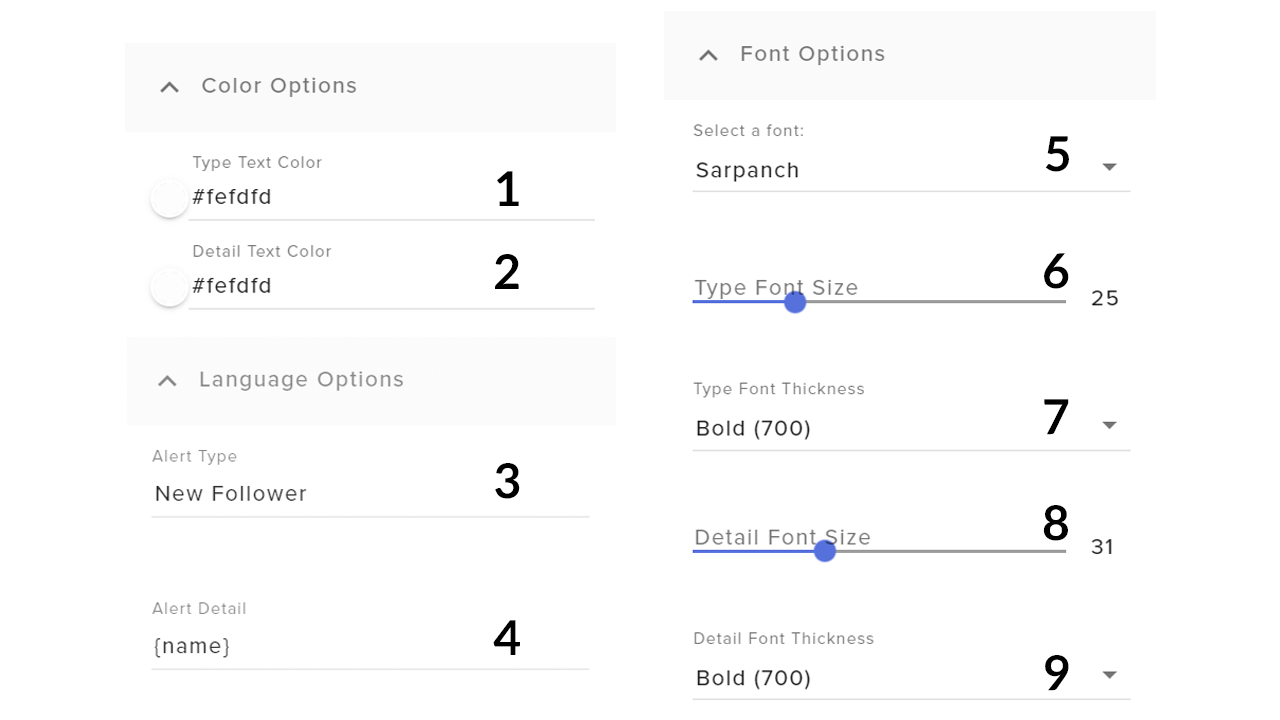
The numbered list below corresponds with the numbers shown in the image above.
- Changes the color of the type text e.g “New Follower”
- Changes the color of the detail text e.g “Lempons donated $100”
- Changes the text to describe the type of alert
- Changes the text for the detail portion of text
- Changes the font that is used for the alerts.
- Changes the font size used for the type text
- Changes the font thickness used for the type text
- Changes the font size used for the detail text
- Changes the font thickness used for the detail text
Chatbox Customisation
- See above video on how to navigate to your chat box widget. Alternatively follow this link to quickly get there https://streamlabs.com/dashboard#/chatbox
- Scroll down until you see a Custom Fields tab
- Select this tab and you will see all of the customization options as shown in the image below
After you make any changes make sure to press Save Settings to apply those changes
NOTE : Your customisation settings may vary from those shown in example.
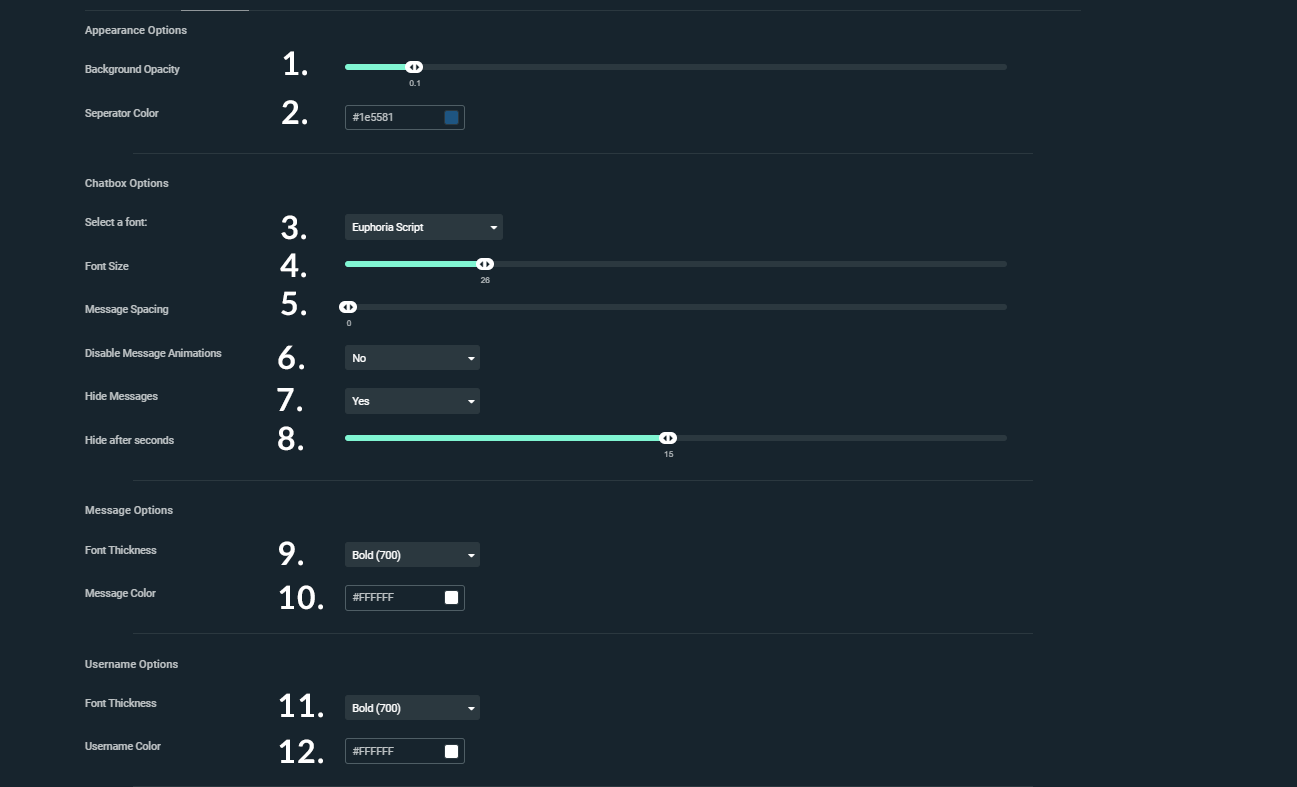
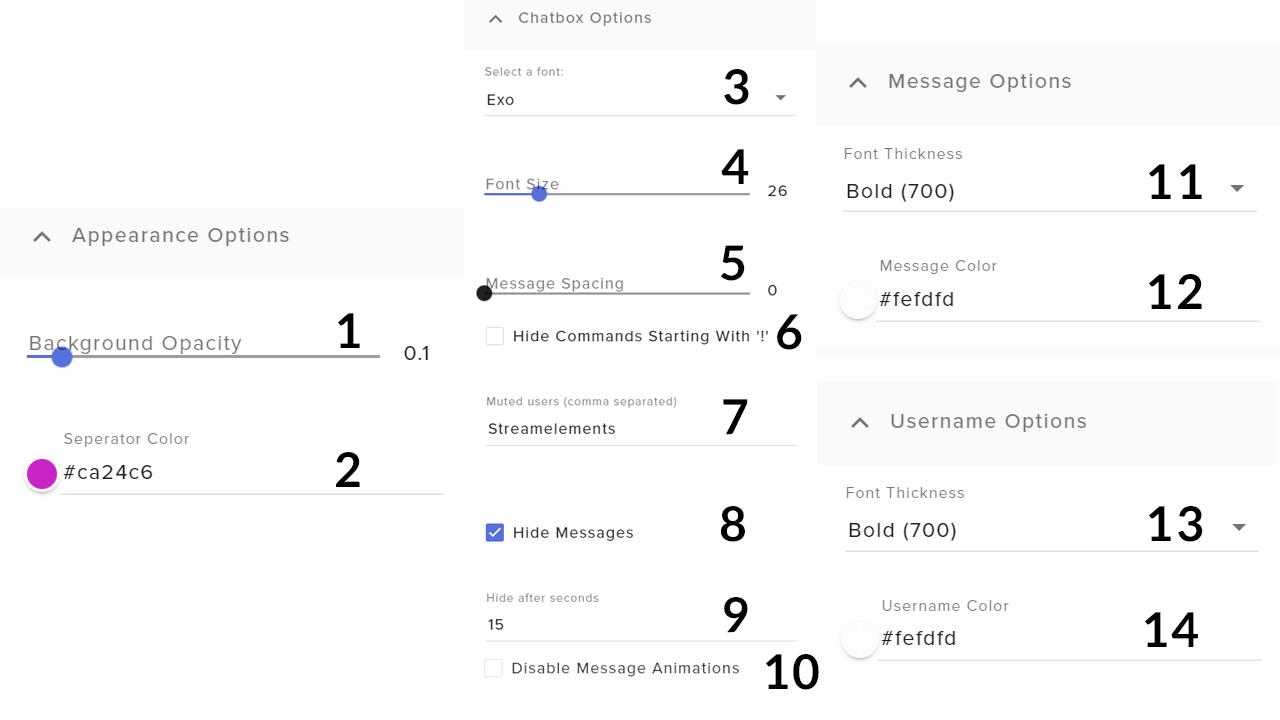
The numbered list below corresponds with the numbers shown in the image above.
- This changes the transparency of the background behind the chatbox. 0 being fully transparent and 1 being fully visible
- Changes the color of the separator bar between each chat message
- Changes the font used for the chat box text
- Changes the font size of the chat box text
- Changes the vertical spacing between each chat entry
- If set to Yes the entry animation of the chat message is disabled and messages will just appear
- If set to Yes messages will disappear based on the Hide After value
- Sets the number of seconds that a chat message will disappear after it is shown
- Changes the font thickness of the message text
- Changes color of the message text
- Changes the thickness of the username text
- Changes the color of the username text
Event List Customisation
- See above video on how to navigate to your event list widget. Alternatively follow this link to quickly get there https://streamlabs.com/dashboard#/eventlist
- Scroll down until you see a Custom Fields tab
- Select this tab and you will see all of the customization options as shown in the image below
After you make any changes make sure to press Save Settings to apply those changes

NOTE : Your customisation settings may vary from those shown in example.
The numbered list below corresponds with the numbers shown in the image above.
- Changes color of the primary text (Usually the username)
- Changes the color of the secondary text (Usually the event type)
- Changes the font type used for the event list
- Changes the font size used for the event list
- Changes the vertical spacing between each event
- Changes how the primary and secondary text are laid out
- Changes the maximum number of events that can be shown
- Changes the event entry animation speed
- Changes the event entry animation style
Goals Customisation
- See above video on how to navigate to your follow goal widget. To find the other goal versions, follow the same steps to get to your widgets and then look for the goal type. Alternatively follow this link to quickly get there https://streamlabs.com/dashboard#/widgets
- Scroll down until you see a Settings tab and select it
- Again Scroll down until you see a Custom Fields tab
- Select this tab and you will see all of the customization options as shown in the image below
- After you make any changes make sure to press Save Settings to apply those changes
NOTE : Your customisation settings may vary from those shown in example.
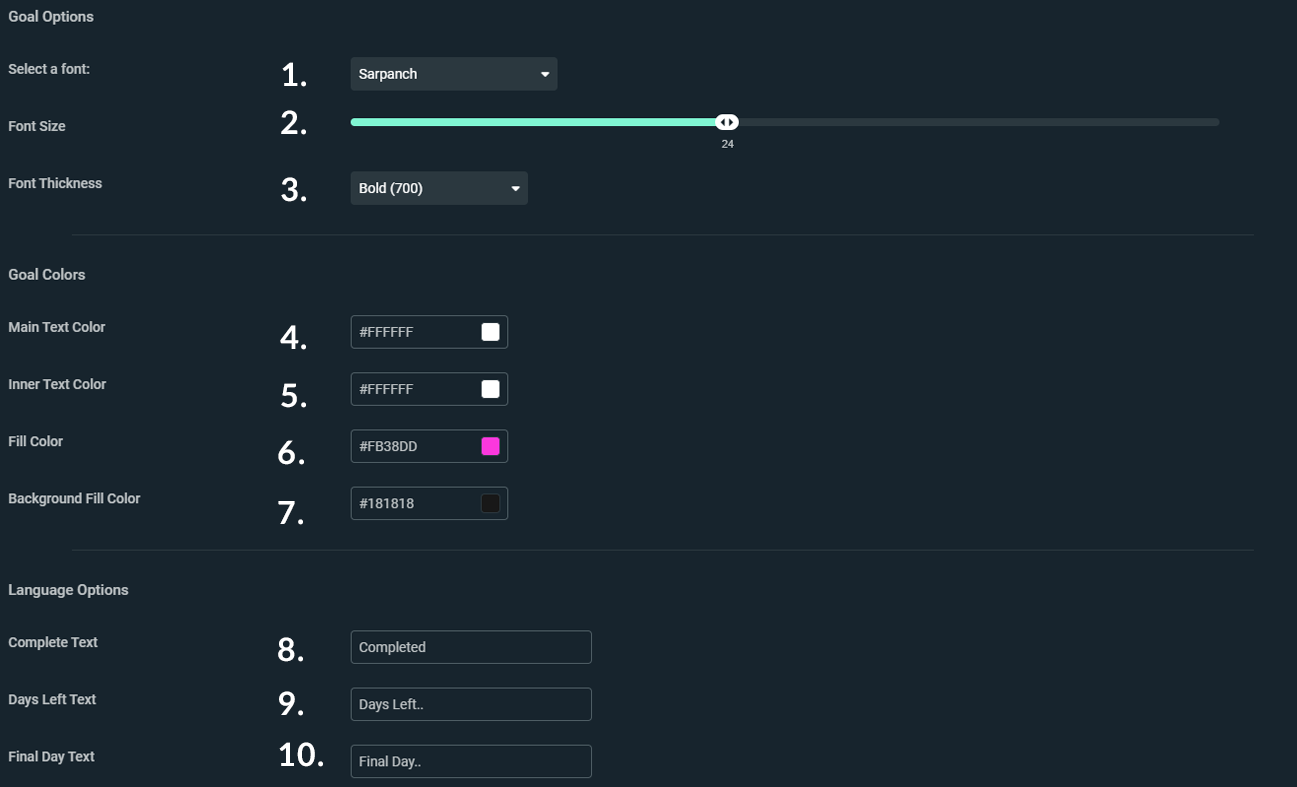
The numbered list below corresponds with the numbers shown in the image above.
- Changes font type of the goal
- Changes font size of the goal
- Changes font thickness of the goal
- Changes color of the main text (Above and below the goal)
- Changes color of the inner text (Inside the goal fill bar)
- Change color in which the goal bar fills up with
- Changes the background color (Color behind the fill bar)
- Changes the text used when a goal has been completed
- Changes the text that describes how many days are left for the goal
- Changes the text that shows when the goal is on it’s final day
Streamelements Widgets
Installation
Event List, Chatbox and Goals
The process for installing each Streamelements widget is the same, with the alerts being an exception. Follow the process below to setup Event List, Chat Box and Goals
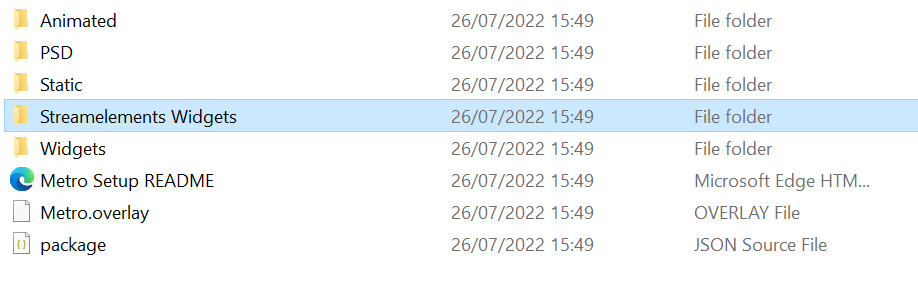
- Open the “Streamelements Widgets” folder at the root of your package folder
- Now open the corresponding folder of the widget you would like to setup. We will show you the event list for the purpose of this tutorial, so we’ll open the “SE Event List” folder

- You will see text files as shown above
- Keep this folder open and head over to Streamelements
- Expand left sidebar -> Streaming Tools -> My Overlays
- Alternatively you can go straight to this page with the following link https://streamelements.com/dashboard/overlays?section=all
- Press New Overlay button and set resolution ideally to 1080p then press Start
- In the left sidebar select Add Widget -> Static/Custom -> Custom Widget
- Select the widget in the layers section
- Expand Postion, size and style
- Set the width and height, see our recommended widget sizes
- Select the widget in the layers section
- Expand Settings -> Open Editor
- You will see a new window, with the tabs HTML, CSS, JS, FIELDS and DATA
- You will notice these tab names will correspond with the text file names in the folder we opened in previous step
- You will now copy the text from each text file and paste it into the corresponding tab (Make sure to delete existing text before pasting). E.g Copy text from HTML text file and paste it into the HTML tab
- You will notice some widgets have multiple text files with the name fields.
- If you are using twitch to stream then you would copy the text from fields-twitch into the fields tab on Streamelements
- Press Done, and then Save in the upper right
Alerts
- Open the “Streamelements Widgets” folder at the root of your package folder
- Now open SE Alerts folder
- Head over now to your Streamelements dashboard
- Expand left sidebar -> Streaming Tools -> My Overlays
- Alternatively you can go straight to this page with the following link https://streamelements.com/dashboard/overlays?section=all
- Press New Overlay button and set resolution ideally to 1080p then press Start
- In the left sidebar select Add Widget -> Alerts -> Alert Box
- Select the widget in the layers section
- Expand Postion, size and style
- Set the width and height, see our recommended widget sizes
- Select the widget in the layers section
- Expand Settings -> Select the Gear icon next to the alert you want to set up
- Scroll down and set Alert Duration to 7
- Continue scrolling and enable the Enable custom css toggle
- Select Open CSS Editor
- You will see a new window, with the tabs HTML, CSS, JS, FIELDS and DATA
- You will notice these tab names will correspond with the text file names in the folder we opened in previous step
- You will now copy the text from each text file and paste it into the corresponding tab (Make sure to delete existing text before pasting). E.g Copy text from HTML text file and paste it into the HTML tab
- Press Done, and then Save in the upper right
Setup In OBS
- Go to My Overlays, quickly access through this link https://streamelements.com/dashboard/overlays
- Press the icon with three dots on the widget you want to set up
- Copy URL
- In OBS press the + icon in the Sources section
- Select Browser, name accordingly
- Paste the URL into the URL field
- Set the width and height to the same as the the Streamelements widget
- Repeat this process for every widget you want setup
Customization
Alert Box Customisation
- Go to My Overlays in Streamelements https://streamelements.com/dashboard/overlays
- Press Edit on your alert box widget
- Select the alert box in Layers section
- Go to Settings
- Press gear icon of the alert you would like to customize
- Scroll until you see the collapsible field groups
- Each group can be expanded to reveal the editable options
The numbered list below corresponds with the numbers shown in the image above.
- Changes the color of the type text e.g “New Follower”
- Changes the color of the detail text e.g “Lempons donated $100”
- Changes the text to describe the type of alert
- Changes the text for the detail portion of text
- Changes the font that is used for the alerts
- Changes the font size used for the type text
- Changes the font thickness used for the type text
- Changes the font size used for the detail text
- Changes the font thickness used for the detail text
Chat Box Customisation
- Go to My Overlays in Streamelements https://streamelements.com/dashboard/overlays
- Press Edit on your Chat Box widget
- Select the chat box in Layers section
- Go to Settings
- Scroll until you see the collapsible field groups
- Each group can be expanded to reveal the editable options
The numbered list below corresponds with the numbers shown in the image above.
- This changes the transparency of the background behind the chatbox. 0 being fully transparent and 1 being fully visible
- Changes the color of the separator bar between each chat message
- Changes the font used for the chat box text
- Changes the font size of the chat box text
- Changes the vertical spacing between each chat entry
- If Enabled then commands will not be shown in the chat
- This is a comma separated list of users that will be muted from the chat
- If Enabled messages will disappear based on the Hide After value
- Sets the number of seconds that a chat message will disappear after it is shown
- If Enabled the entry animation of the chat message is disabled and messages will just appear
- Changes the font thickness of the message text
- Changes color of the message text
- Changes the thickness of the username text
- Changes the color of the username text
Event List Customisation
- Go to My Overlays in Streamelements https://streamelements.com/dashboard/overlays
- Press Edit on your Event List widget
- Select the event list in Layers section
- Go to Settings
- Scroll until you see the collapsible field groups
- Each group can be expanded to reveal the editable options
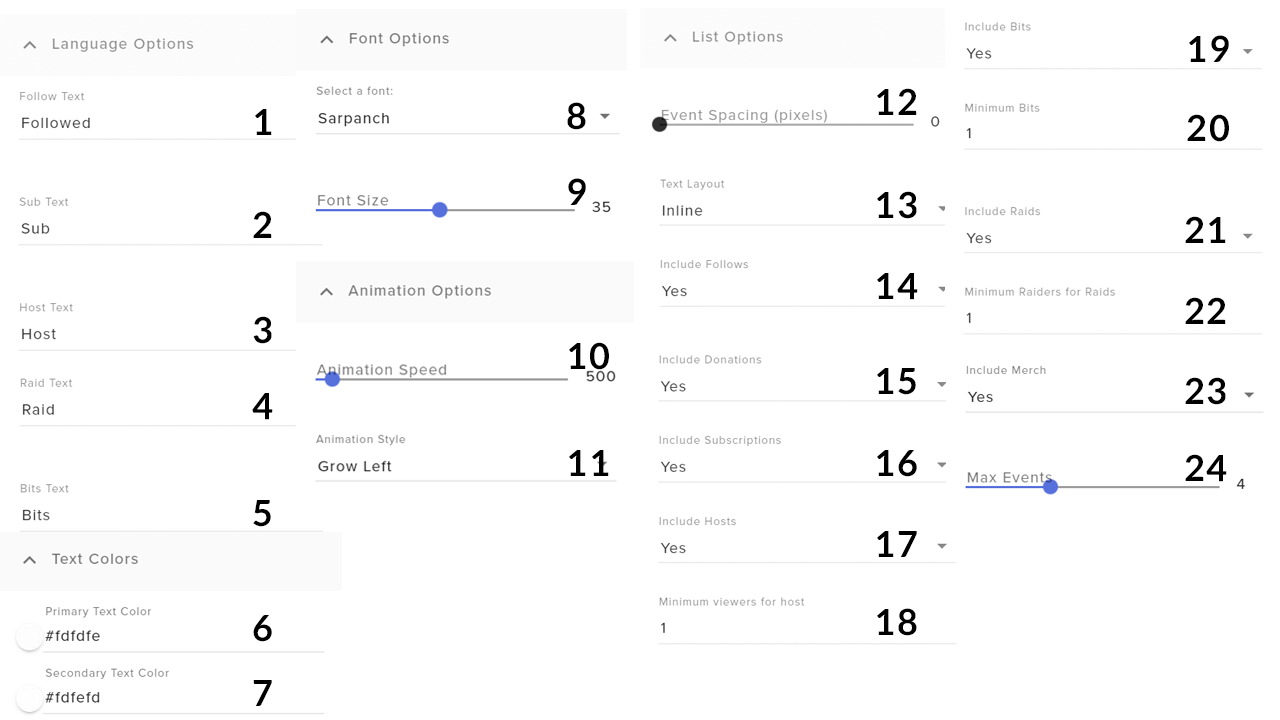
The numbered list below corresponds with the numbers shown in the image above (Note :some options are different based on the platform you stream on, this example shows the Twitch customisation options)
- Changes text used when a follow event occurs
- Changes text used when a sub event occurs
- Changes text used when a host event occurs
- Changes text used when a raid event occurs
- Changes text used when a bits event occurs
- Changes color of the primary text (Usually the username)
- Changes the color of the secondary text (Usually the event type)
- Changes the font type used for the event list
- Changes the font size used for the event list
- Changes the event entry animation speed
- Changes the event entry animation style
- Changes the vertical spacing between each event
- Changes how the primary and secondary text are laid out
- If Enabled then follow events will be shown
- If Enabled then donation events will be shown
- If Enabled then subscription events will be shown
- If Enabled then host events will be shown
- Set the minimum number of viewers from the hosting channel, required to trigger a host event
- If Enabled then bit events will be shown
- Set the minimum number of bits required to trigger a host event
- If Enabled then raid events will be shown
- Set the minimum number of raiders required to trigger a raid event
- If Enabled then merch events will be shown
- Changes the maximum number of events that can be shown
Goals Customisation
- Go to My Overlays in Streamelements https://streamelements.com/dashboard/overlays
- Press Edit on your Goal widget
- Select the goal widget in Layers section
- Go to Settings
- Scroll until you see the collapsible field groups
- Each group can be expanded to reveal the editable options
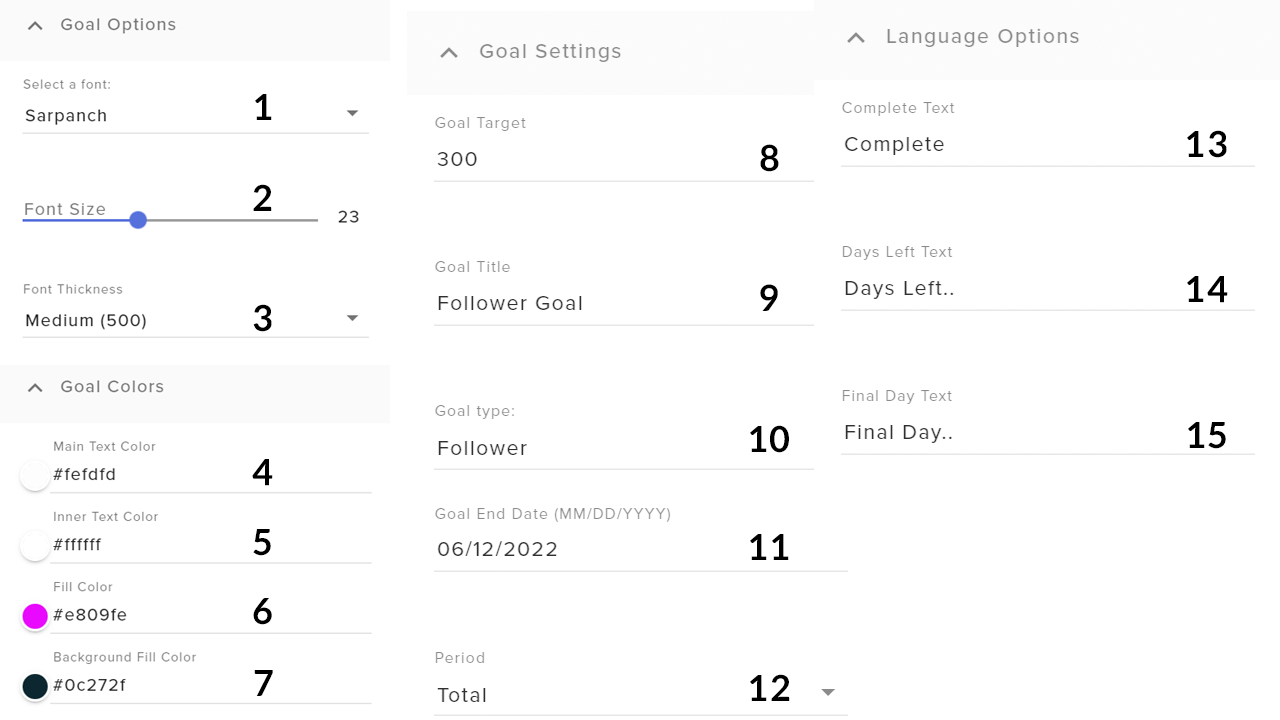
The numbered list below corresponds with the numbers shown in the image above (Note : Some options are different based on the platform you stream on, this example shows the Twitch customisation options)
- Changes font type of the goal
- Changes font size of the goal
- Changes font thickness of the goal
- Changes color of the main text (Above and below the goal)
- Changes color of the inner text (Inside the goal fill bar)
- Change color in which the goal bar fills up with
- Changes the background color (Color behind the fill bar)
- Sets the target amount for the goal
- Sets the name of the goal
- Sets the metric type for the goal
- Set the end date of the goal using (MM/DD/YYYY) format
- Changes the period, total will be based on total amount, session is based on how much is accumalted during a streaming session
- Changes the text used when a goal has been completed
- Changes the text that describes how many days are left for the goal
- Changes the text that shows when the goal is on it’s final day
Streamlabs Overlay Setup
One Click Install
- Locate the overlay file in root folder of package
- Select the gear icon in the lower left of Streamlabs to access settings
- Navigate to Scene Collections
- Select Import Overlay File, then select your .overlay file
OBS Overlay Setup
Importing OBS Scene Collection
Unlike the Streamlabs one click install, the OBS import is less advanced and imports only the scene collection structure. You will still have to manually add the files to sources.
- Select Scene Collection dropdown menu
- Select import and locate the package.json file in the root of your package folder
- Select Scene Collection dropdown menu and select package
Adding Animations / Static Files To Sources
- Right click the source and select properties
- Click the browse button and then locate the relevant animation file in your package folder
- For static files, use an image source in place of a media source and follow the same procedure above.
Adding/Configuring Stinger Transition
- Select the + icon in the scene transitions section to add a new transition
- Alternatively select the gear icon to edit an existing scene transition
- In the scene transitions window, select the browse button and select the animated transition file in the package folder
- Change Transition Point Type to frame
- In the Transition Point section set the value between 30-50
Tip : The transition point determines how long after changing scenes that the background changes. You want the transition point to be when the animation has fully covered the screen
Streamelements Overlay Setup
Importing OBS Scene Collection
- Select Scene Collection dropdown menu
- Select import and locate the SE_package.json file in the root of your package folder
- Select Scene Collection dropdown menu and select package
Adding Animations / Static Files To Sources
- Go to My Overlays in Streamelements or access through this link https://streamelements.com/dashboard/overlays
- Press New Overlay button
- Set resolution preferably 1080p and press Start
- Press Add Widget -> Static/Custom -> Video
- Alternatively to use a static image press Add Widget -> Static/Custom -> Image
- In the Position, Style and Size set width 1920 and height 1080
- Press Save
- Go to My Overlays in Streamelements or access through this link https://streamelements.com/dashboard/overlays
- Press the three dots on the the overlay you wish to setup
- Select Copy URL
- In OBS right click the corresponding source and select properties
- Paste the URL you copied in the previous steps in the URL field and press ok
Adding/Configuring Stinger Transition
For adding or configuring a Stinger Transition See here
Installing Twitch Panels
- Head over to Twitch
- Sign in and click your avatar in the top right corner
- From the dropdown click Channel
- Click on the tab titled About
- Enable Edit Panels button
- Select the + button
- Select Add Text Or Image Panel
You should now see the setup like the image below
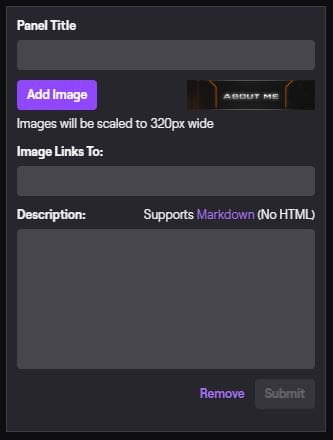
- Upload your panel image, provide a link if necessary and fill in the description
- Click submit to save your changes
- Repeat this process for all panels
Bonus Features
Dynamic Intermission Screen
Most of our packages will include the animated background only file. With the help of a powerful plugin called Streamfx for OBS, and a filter called dynamic mask we can create fully dynamic placement of the cut-out for the intermission screen.
- Download Stream FX and follow the installation instructions
- Setup your intermission scene using a media source with animated bg only as the source file
- Create a new scene, and name it Intermission Cutout
- In this new scene create a Color Source and set it’s color to #00ff00
- Scale it down and position where you want intermission cutout to be.

- Switch back to main scene containing intermission media source.
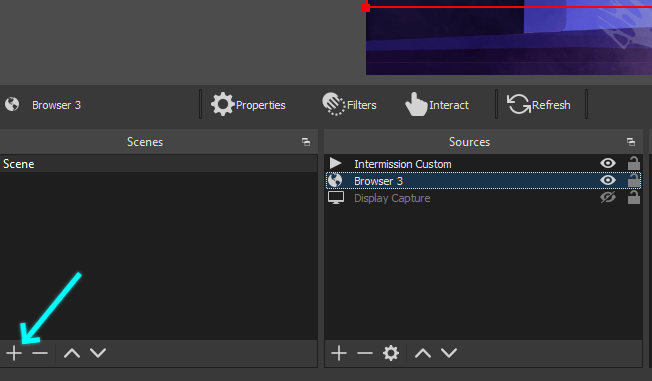
- Right click the source -> Filters
- Add new Effect Filter -> Dynamic Mask
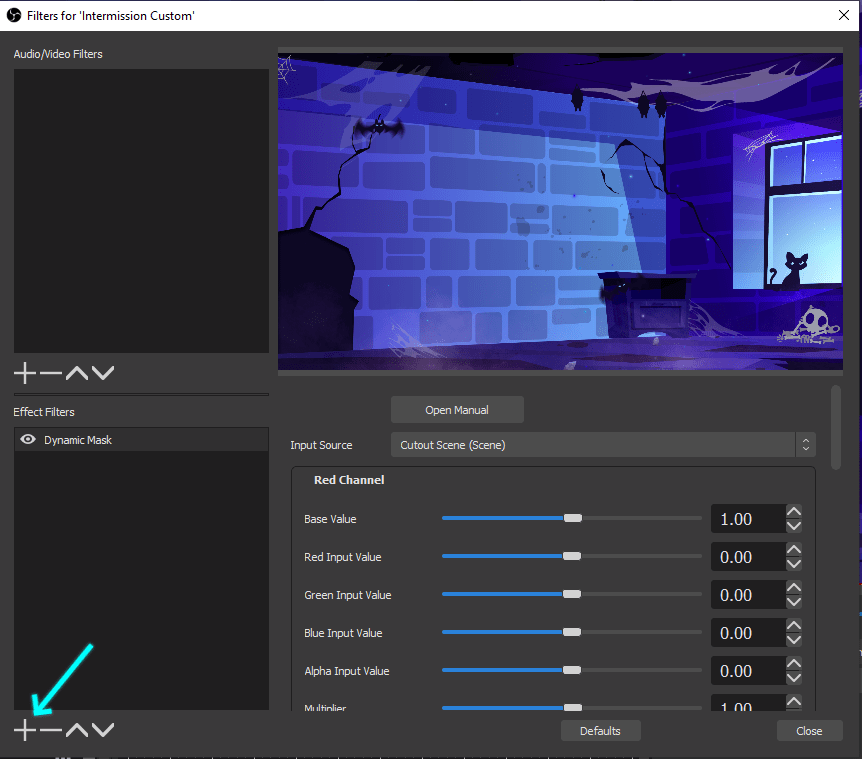
- Once added, the settings are to the right
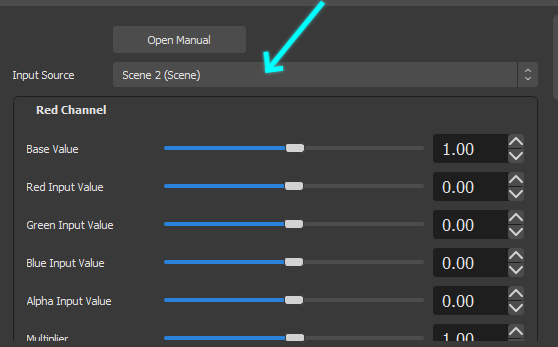
- Set the input source to the intermission scene
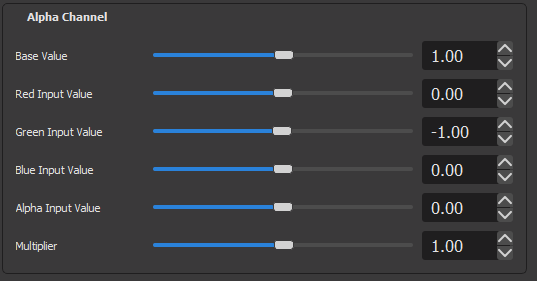
- Scroll down to the Alpha Channel section
- Set Green Input Value to -1
- You should now see a cut-out on your intermission scene.
- To change the position of the cut-out, simply switch to your Intermission Cutout scene and reposition the colour source.

- An optional step is to create another media source for the webcam border which lines up over the intermission cutout
Hexeum
© 2025 Hexeum. All rights reserved
Login
Register
We use cookies to ensure that we give you the best experience on our website. If you continue to use this site we will assume that you are happy with it.OkNoPrivacy policy